Common Mistakes When Using a 555 Timer
Here are some mistakes to avoid:
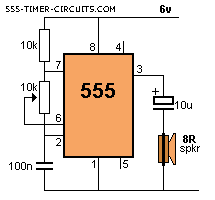
1. Pin 7 gets connected to the 0v rail via a transistor inside the
chip during part of the operation of the 555. If the pot is turned
to very low resistance in the following circuit, a high current will
flow through the pot and it will be damaged:

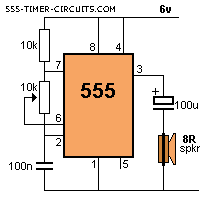
2. The impedance of the 100u electrolytic will allow a very high
current to flow and the chip will get very hot. Use 10u
maximum when using 8R speaker.
3. The reset pin (pin 4) is internally tied HIGH via approx 100k but
it should not be left floating as stray pulses may reset the chip.
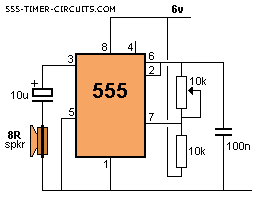
4. Do not draw 555 circuits as shown in the following diagram. Keep
to a standard layout so the circuit is easy to follow.
5.
Here's an example from the web. It takes a lot of time to work out
what the circuit is doing:
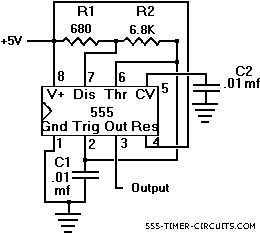
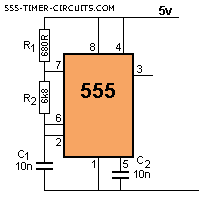
The aim it to lay-out a circuit so that it shows instantly what is
happening. That's why everything must be in recognised locations.
Here is the corrected circuit: From this diagram it is obvious the
circuit is an oscillator (and not a one-shot etc).
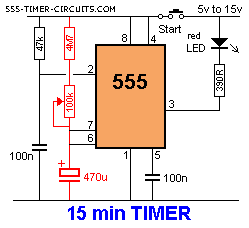
6. Don't use high value electrolytics and high resistances to
produce long delays. The 555 is very unreliable with timing values
above 5-10 minutes. The reason is simple. The charging current for
the electrolytic is between 1 - 3 microamp in the following diagram
(when the electro is beginning to charge) and drops to less than 1
microamp when the electro is nearly charged.
If the leakage of the electro is 1 microamp, it will never fully
charge and allow the 555 to "time-out."
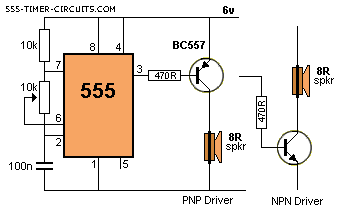
7. Do not connect a PNP to the output of a 555 as shown in the
following diagram. Pin 3 does not rise high enough to turn off the
transistor and the current taken by the circuit will be excessive.
Use an NPN driver.
